Wednesday, September 26, 2018

ffmpeg options

some mobile devices cannot decode high resolution video or higher level H264 video.
ffmpeg can be used to re-encode these videos.

here's are some examples.

c:\portable\ffmpeg\bin\ffmpeg -i input.mp4 -vcodec libx264 -crf 23 -preset fast -profile:v baseline -level 3 -refs 6 -vf "scale=640:-1, pad=iw:480:0:(oh-ih)/2, format=yuv420p" -acodec copy output.mp4


c:\portable\ffmpeg\bin\ffmpeg -i "input.mp4" -vcodec libx264 -crf 23 -preset fast -profile:v baseline -level 3 -refs 6 -vf "format=yuv420p" -acodec copy "output.mp4"


And also

To increase the volume of the first audio track for 10dB use:
ffmpeg -i inputfile -vcodec copy -af "volume=10dB" outputfile
To decrease the volume of the first audio track for 5dB use:
ffmpeg -i inputfile -vcodec copy -af "volume=-5dB" outputfile


to concatenate multiple files ito one file (in case for making single file from separate mutiple balckbox files which have multiple video stream (fron and rear video))

Create a file mylist.txt as below

  # this is a comment

  file '/path/to/file1.avi'
  file '/path/to/file2.avi'
  file '/path/to/file3.avi'
 
then use this command
ffmpeg -f concat -safe 0 -i mylist.txt -c copy output.avi
this command makes single out.avi file which have two video stream and a audio stream.
To make single video stream concatenancted file, use concat protocol method.
ffmpeg -i "concat:REC1.avi|REC2.avi|REC3.avi" - c copy d:\_download\out.avi 
but this command failed with message  "[NULL @ 000002070a009d00] Unable to find a suitable output format for 'pipe:'
pipe:: Invalid argument"
ffmpeg -i "concat:REC1.avi|REC2.avi|REC3.avi" d:\_download\out.avi works for me.
 
to choose certain video stream, use filter_complex below.
g:\DRIVING>ffmpeg -i REC1.avi -i REC2.avi -filter_complex "[0:v:1][0:a:0][1:v:1][1:a:0]concat=n=2:v=1:a=1[outv][outa]" -map "[outv]" -map "[outa]" d:\_download\out1.mp4
ffmpeg version 2021-05-02-git-5541cffa17-full_build-www.gyan.dev Copyright (c) 2000-2021 the FFmpeg developers
built with gcc 10.2.0 (Rev6, Built by MSYS2 project)
configuration: --enable-gpl --enable-version3 --enable-static --disable-w32threads --disable-autodetect --enable-fontconfig --enable-iconv --enable-gnutls --enable-libxml2 --enable-gmp --enable-lzma --enable-libsnappy --enable-zlib --enable-librist --enable-libsrt --enable-libssh --enable-libzmq --enable-avisynth --enable-libbluray --enable-libcaca --enable-sdl2 --enable-libdav1d --enable-libzvbi --enable-librav1e --enable-libsvtav1 --enable-libwebp --enable-libx264 --enable-libx265 --enable-libxvid --enable-libaom --enable-libopenjpeg --enable-libvpx --enable-libass --enable-frei0r --enable-libfreetype --enable-libfribidi --enable-libvidstab --enable-libvmaf --enable-libzimg --enable-amf --enable-cuda-llvm --enable-cuvid --enable-ffnvcodec --enable-nvdec --enable-nvenc --enable-d3d11va --enable-dxva2 --enable-libmfx --enable-libglslang --enable-vulkan --enable-opencl --enable-libcdio --enable-libgme --enable-libmodplug --enable-libopenmpt --enable-libopencore-amrwb --enable-libmp3lame --enable-libshine --enable-libtheora --enable-libtwolame --enable-libvo-amrwbenc --enable-libilbc --enable-libgsm --enable-libopencore-amrnb --enable-libopus --enable-libspeex --enable-libvorbis --enable-ladspa --enable-libbs2b --enable-libflite --enable-libmysofa --enable-librubberband --enable-libsoxr --enable-chromaprint
libavutil 57. 0.100 / 57. 0.100
libavcodec 59. 0.100 / 59. 0.100
libavformat 59. 0.100 / 59. 0.100
libavdevice 59. 0.100 / 59. 0.100
libavfilter 8. 0.101 / 8. 0.101
libswscale 6. 0.100 / 6. 0.100
libswresample 4. 0.100 / 4. 0.100
libpostproc 56. 0.100 / 56. 0.100
[h264 @ 000001bc05d2f4c0] non-existing PPS 0 referenced
Last message repeated 1 times
[h264 @ 000001bc05d2f4c0] decode_slice_header error
[h264 @ 000001bc05d2f4c0] no frame!
[h264 @ 000001bc05d2f4c0] non-existing PPS 0 referenced
Last message repeated 1 times
[h264 @ 000001bc05d2f4c0] decode_slice_header error
[h264 @ 000001bc05d2f4c0] no frame!
[h264 @ 000001bc05d2f4c0] non-existing PPS 0 referenced
Last message repeated 1 times
[h264 @ 000001bc05d2f4c0] decode_slice_header error
[h264 @ 000001bc05d2f4c0] no frame!
[h264 @ 000001bc05d2f4c0] non-existing PPS 0 referenced
Last message repeated 1 times
[h264 @ 000001bc05d2f4c0] decode_slice_header error
[h264 @ 000001bc05d2f4c0] no frame!
Guessed Channel Layout for Input Stream #0.2 : mono
Input #0, avi, from 'REC1.avi':
Duration: 00:01:00.13, start: 0.000000, bitrate: 13950 kb/s
Stream #0:0: Video: h264 (High) (H264 / 0x34363248), yuv420p(progressive), 1280x720, 30 fps, 30 tbr, 30 tbn
Stream #0:1: Video: h264 (Main) (H264 / 0x34363248), yuv420p(progressive), 1280x720, 30 fps, 30 tbr, 30 tbn
Stream #0:2: Audio: pcm_s16le ([1][0][0][0] / 0x0001), 22050 Hz, mono, s16, 352 kb/s
[h264 @ 000001bc05d3f180] non-existing PPS 0 referenced
Last message repeated 1 times
[h264 @ 000001bc05d3f180] decode_slice_header error
[h264 @ 000001bc05d3f180] no frame!
[h264 @ 000001bc05d3f180] non-existing PPS 0 referenced
Last message repeated 1 times
[h264 @ 000001bc05d3f180] decode_slice_header error
[h264 @ 000001bc05d3f180] no frame!
[h264 @ 000001bc05d3f180] non-existing PPS 0 referenced
Last message repeated 1 times
[h264 @ 000001bc05d3f180] decode_slice_header error
[h264 @ 000001bc05d3f180] no frame!
[h264 @ 000001bc05d3f180] non-existing PPS 0 referenced
Last message repeated 1 times
[h264 @ 000001bc05d3f180] decode_slice_header error
[h264 @ 000001bc05d3f180] no frame!
[h264 @ 000001bc05d3f180] non-existing PPS 0 referenced
Last message repeated 1 times
[h264 @ 000001bc05d3f180] decode_slice_header error
[h264 @ 000001bc05d3f180] no frame!
[h264 @ 000001bc05d3f180] non-existing PPS 0 referenced
Last message repeated 1 times
[h264 @ 000001bc05d3f180] decode_slice_header error
[h264 @ 000001bc05d3f180] no frame!
[h264 @ 000001bc05d3f180] non-existing PPS 0 referenced
Last message repeated 1 times
[h264 @ 000001bc05d3f180] decode_slice_header error
[h264 @ 000001bc05d3f180] no frame!
[h264 @ 000001bc05d3f180] non-existing PPS 0 referenced
Last message repeated 1 times
[h264 @ 000001bc05d3f180] decode_slice_header error
[h264 @ 000001bc05d3f180] no frame!
[h264 @ 000001bc05d3f180] non-existing PPS 0 referenced
Last message repeated 1 times
[h264 @ 000001bc05d3f180] decode_slice_header error
[h264 @ 000001bc05d3f180] no frame!
[h264 @ 000001bc05d3f180] non-existing PPS 0 referenced
Last message repeated 1 times
[h264 @ 000001bc05d3f180] decode_slice_header error
[h264 @ 000001bc05d3f180] no frame!
[h264 @ 000001bc05d3f180] non-existing PPS 0 referenced
Last message repeated 1 times
[h264 @ 000001bc05d3f180] decode_slice_header error
[h264 @ 000001bc05d3f180] no frame!
Guessed Channel Layout for Input Stream #1.2 : mono
Input #1, avi, from 'REC2.avi':
Duration: 00:01:00.13, start: 0.000000, bitrate: 13950 kb/s
Stream #1:0: Video: h264 (High) (H264 / 0x34363248), yuv420p(progressive), 1280x720, 30 fps, 30 tbr, 30 tbn
Stream #1:1: Video: h264 (Main) (H264 / 0x34363248), yuv420p(progressive), 1280x720, 30 fps, 30 tbr, 30 tbn
Stream #1:2: Audio: pcm_s16le ([1][0][0][0] / 0x0001), 22050 Hz, mono, s16, 352 kb/s
Stream mapping:
Stream #0:1 (h264) -> concat:in0:v0
Stream #0:2 (pcm_s16le) -> concat:in0:a0
Stream #1:1 (h264) -> concat:in1:v0
Stream #1:2 (pcm_s16le) -> concat:in1:a0
concat:out:v0 -> Stream #0:0 (libx264)
concat:out:a0 -> Stream #0:1 (aac)
Press [q] to stop, [?] for help
[libx264 @ 000001bc06548040] using cpu capabilities: MMX2 SSE2Fast SSSE3 SSE4.2 AVX FMA3 BMI2 AVX2
[libx264 @ 000001bc06548040] profile High, level 3.1, 4:2:0, 8-bit
[libx264 @ 000001bc06548040] 264 - core 161 r3053 c347e7a - H.264/MPEG-4 AVC codec - Copyleft 2003-2021 - http://www.videolan.org/x264.html - options: cabac=1 ref=3 deblock=1:0:0 analyse=0x3:0x113 me=hex subme=7 psy=1 psy_rd=1.00:0.00 mixed_ref=1 me_range=16 chroma_me=1 trellis=1 8x8dct=1 cqm=0 deadzone=21,11 fast_pskip=1 chroma_qp_offset=-2 threads=12 lookahead_threads=2 sliced_threads=0 nr=0 decimate=1 interlaced=0 bluray_compat=0 constrained_intra=0 bframes=3 b_pyramid=2 b_adapt=1 b_bias=0 direct=1 weightb=1 open_gop=0 weightp=2 keyint=250 keyint_min=25 scenecut=40 intra_refresh=0 rc_lookahead=40 rc=crf mbtree=1 crf=23.0 qcomp=0.60 qpmin=0 qpmax=69 qpstep=4 ip_ratio=1.40 aq=1:1.00
Output #0, mp4, to 'd:\_download\out1.mp4':
Metadata:
encoder : Lavf59.0.100
Stream #0:0: Video: h264 (avc1 / 0x31637661), yuv420p(progressive), 1280x720, q=2-31, 30 fps, 15360 tbn (default)
Metadata:
encoder : Lavc59.0.100 libx264
Side data:
cpb: bitrate max/min/avg: 0/0/0 buffer size: 0 vbv_delay: N/A
Stream #0:1: Audio: aac (LC) (mp4a / 0x6134706D), 22050 Hz, mono, fltp, 69 kb/s (default)
Metadata:
encoder : Lavc59.0.100 aac
frame= 3608 fps= 64 q=-1.0 Lsize= 82162kB time=00:02:00.27 bitrate=5596.1kbits/s dup=11 drop=0 speed=2.13x
video:81343kB audio:721kB subtitle:0kB other streams:0kB global headers:0kB muxing overhead: 0.119143%
[libx264 @ 000001bc06548040] frame I:28 Avg QP:24.31 size: 75653
[libx264 @ 000001bc06548040] frame P:1173 Avg QP:25.77 size: 30988
[libx264 @ 000001bc06548040] frame B:2407 Avg QP:27.43 size: 18623
[libx264 @ 000001bc06548040] consecutive B-frames: 10.4% 0.7% 3.9% 85.0%
[libx264 @ 000001bc06548040] mb I I16..4: 17.5% 28.9% 53.6%
[libx264 @ 000001bc06548040] mb P I16..4: 6.1% 15.0% 6.2% P16..4: 40.6% 14.3% 5.1% 0.0% 0.0% skip:12.7%
[libx264 @ 000001bc06548040] mb B I16..4: 1.9% 1.9% 1.5% B16..8: 51.9% 11.7% 2.0% direct:12.0% skip:17.2% L0:55.3% L1:39.3% BI: 5.4%
[libx264 @ 000001bc06548040] 8x8 transform intra:48.7% inter:33.7%
[libx264 @ 000001bc06548040] coded y,uvDC,uvAC intra: 82.0% 27.7% 3.2% inter: 33.7% 13.0% 0.4%
[libx264 @ 000001bc06548040] i16 v,h,dc,p: 10% 20% 41% 29%
[libx264 @ 000001bc06548040] i8 v,h,dc,ddl,ddr,vr,hd,vl,hu: 12% 17% 28% 6% 7% 5% 10% 5% 10%
[libx264 @ 000001bc06548040] i4 v,h,dc,ddl,ddr,vr,hd,vl,hu: 15% 25% 24% 6% 7% 5% 9% 4% 7%
[libx264 @ 000001bc06548040] i8c dc,h,v,p: 66% 19% 13% 3%
[libx264 @ 000001bc06548040] Weighted P-Frames: Y:2.5% UV:0.7%
[libx264 @ 000001bc06548040] ref P L0: 58.6% 13.2% 17.5% 10.6% 0.2%
[libx264 @ 000001bc06548040] ref B L0: 88.0% 8.7% 3.3%
[libx264 @ 000001bc06548040] ref B L1: 94.1% 5.9%
[libx264 @ 000001bc06548040] kb/s:5540.63
[aac @ 000001bc0633c480] Qavg: 64920.262   


Saturday, August 11, 2018

윈도우10 PE 부팅 메뉴에 추가


http://zeroplus1.zc.bz/jh/web/main.php?id=138&category=ETC
  • 윈도우10 PE 부팅 메뉴에 추가
  • 1. 준비물

    boot.sdi (boot 폴더)
    boot.wim (sources 폴더)
    # 위 두 파일을 F:\ 에 복사

    2. {ramdiskoptions} 생성 작업

    bcdedit /create {ramdiskoptions} /d "Ramdisk Options"
    bcdedit /set {ramdiskoptions} ramdisksdidevice partition=F:
    bcdedit /set {ramdiskoptions} ramdisksdipath \boot.sdi
    bcdedit /deletevalue {ramdiskoptions} description

    3. PE를 부팅 메뉴에 추가

    bcdedit /create /d "Windows PE 부팅 구성" /application osloader      # {GUID} 식별자 생성됨
    bcdedit /set {GUID} device "ramdisk=[F:]\boot.wim,{ramdiskoptions}"
    bcdedit /set {GUID} osdevice "ramdisk=[F:]\boot.wim,{ramdiskoptions}"
    bcdedit /set {GUID} path \Windows\System32\Winload.exe
    bcdedit /set {GUID} systemroot \Windows
    bcdedit /set {GUID} locale ko-KR
    bcdedit /set {GUID} inherit {bootloadersettings}
    bcdedit /set {GUID} detecthal Yes
    bcdedit /set {GUID} winpe Yes
    bcdedit /displayorder {GUID} /addlast      # 처음에 추가: /addfirst, 마지막에 추가: /addlast

Sunday, August 27, 2017

windows recovery environment partiton

GPT 방식의 윈도우 파티션 구성에서 ESD (EFI Boot system)과 함께 MSR, 리커버리 파티션 등을 설치할 것을 권하고 있다.
윈도우 7, 8 , 8,1, 10까지 동일한 방식을 권장하는 것으로 보이며 microsoft 사이트에서도 해당 정보들이 혼재되어 나타난다.
최신 OS에서 파티션 구성을 어떻게 해야 할지 개념이 명확하지 않아 혼란 스러운 상황이다.

그 중에서도 리커버리 파티션의 경우 만들라고는 되어있으나, 막상 어떤 방식으로 리커버리 환경을 구성할 지도 잘 제시되어 있지 않다.
아래의 sysnet.pe.ke는 정성태 (kevin13@chol.net) 남이 운영하는 사이트로 가장 정리가 잘 된 것 같아 다음에 설치를 대비해 복사해 둔다.

http://www.sysnet.pe.kr/Default.aspx?mode=2&sub=0&detail=1&pageno=0&wid=11209&rssMode=1&wtype=0


Windows 10의 Recovery 파티션을 삭제 및 새로 생성하는 방법

이전 글에서 복구 모드로의 부팅을 설명했는데요.


Windows 10의 복구 콘솔로 부팅하는 방법
; http://www.sysnet.pe.kr/2/0/11207

복구 모드와 '복구 파티션(Recovery partition)'과는 무슨 관계가 있을까요? ^^

우선, "Disk Management" 관리 콘솔을 이용해 복구 파티션이 있는지 확인할 수 있습니다.

boot_recovery_mode_1.png

그리고, 자신의 Windows 10 PC에서 정상적으로 복구 콘솔 기능이 동작하고 있는지 reagentc.exe를 관리자 권한으로 실행해 보면 알 수 있습니다.

C:\Windows\System32>reagentc /info
Windows Recovery Environment (Windows RE) and system reset configuration
Information:

    Windows RE status:         Enabled
    Windows RE location:       \\?\GLOBALROOT\device\harddisk0\partition1\Recovery\WindowsRE
    Boot Configuration Data (BCD) identifier: cb172ec6-1b4f-11e7-947f-da9018c8edfd
    Recovery image location:
    Recovery image index:      0
    Custom image location:
    Custom image index:        0

REAGENTC.EXE: Operation Successful.

"Windows 10의 복구 콘솔로 부팅하는 방법" 글에서 설명한 데로 복구 콘솔로 진입한다는 것은 곧, "\\?\GLOBALROOT\device\harddisk0\partition1\Recovery\WindowsRE"에 저장된 winre.wim 이미지를 사용한다는 것과 같습니다.

그런데, 복구 콘솔로 진입한 경우에 나오는 "X:" 드라이브가 좀 재미있습니다. 해당 드라이브는 "\\?\GLOBALROOT\device\harddisk0\partition1\Recovery\WindowsRE" 폴더에 직접 매핑되는 것은 아니고, 윈도우는 RAM DISK를 만들어 그곳에 WindowsRE 폴더의 내용을 복사해 복구 콘솔을 운영하는 방식으로 동작합니다. 이에 관해 다음의 문서에서 설명하는,

Windows Recovery Environment (Windows RE)
; https://msdn.microsoft.com/en-us/windows/hardware/commercialize/manufacture/desktop/windows-recovery-environment--windows-re--technical-reference

bcdedit /enum all 명령어로 그 힌트를 찾을 수 있습니다.

Windows Boot Loader
-------------------
identifier              {f4117904-10c3-11e7-b9ca-9b96daeebba1}
device                  ramdisk=[unknown]\Recovery\WindowsRE\Winre.wim,{f4117905-10c3-11e7-b9ca-9b96daeebba1}
path                    \windows\system32\winload.efi
description             Windows Recovery Environment
locale                  en-US
inherit                 {bootloadersettings}
displaymessage          Recovery
osdevice                ramdisk=[unknown]\Recovery\WindowsRE\Winre.wim,{f4117905-10c3-11e7-b9ca-9b96daeebba1}
systemroot              \windows
nx                      OptIn
bootmenupolicy          Standard
winpe                   Yes


물론, 복구 파티션은 삭제해도 상관없습니다. 그래도 여전히 윈도우 부팅은 가능하고 단지 복구 콘솔로의 진입만 못하는 것뿐입니다.

실제로 ^^ 한번 삭제를 해볼까요? 관리자 권한의 diskpart.exe를 실행하고,

C:\Windows\System32>diskpart

Microsoft DiskPart version 10.0.15063.0

Copyright (C) Microsoft Corporation.
On computer: TESTPC

DISKPART>

윈도우가 설치된 디스크를 선택한 후,

DISKPART> list disk

  Disk ###  Status         Size     Free     Dyn  Gpt
  --------  -------------  -------  -------  ---  ---
  Disk 0    Online           64 GB   450 MB        *
  Disk 1    Online           24 GB      0 B        *

DISKPART> sel disk 0

Disk 0 is now the selected disk.

해당 디스크의 "Recovery" 파티션까지 선택한 다음,

DISKPART> list part

  Partition ###  Type              Size     Offset
  -------------  ----------------  -------  -------
  Partition 1    Recovery           449 MB  1024 KB
  Partition 2    System             100 MB   451 MB
  Partition 3    Reserved            16 MB   551 MB
  Partition 4    Primary             63 GB   567 MB

DISKPART> select part 1

이렇게 삭제할 수 있습니다.

DISKPART> delete part override

DISKPART> list part

  Partition ###  Type              Size     Offset
  -------------  ----------------  -------  -------
  Partition 2    System             100 MB   451 MB
  Partition 3    Reserved            16 MB   551 MB
  Partition 4    Primary             63 GB   567 MB

이제 다시 "Advanced startup"으로 재부팅하는 경우, 다음 화면과 같이 "Troubleshoot"로 들어가도 "Command Prompt"로의 (들어가는 메뉴가 없어져) 복구 콘솔로 들어갈 수 없습니다.

recovery_partition_2.png

이런 상황에서 reagentc.exe를 실행해 보면 다음과 같이 "Windows RE status"가 "Disabled"로 나옵니다.

C:\Windows\system32>reagentc /info
Windows Recovery Environment (Windows RE) and system reset configuration
Information:

    Windows RE status:         Disabled
    Windows RE location:
    Boot Configuration Data (BCD) identifier: f411790a-10c3-11e7-b9ca-9b96daeebba1
    Recovery image location:
    Recovery image index:      0
    Custom image location:
    Custom image index:        0

REAGENTC.EXE: Operation Successful.

즉, Recovery Partition을 지워도 "복구 모드"로의 부팅은 되지만, 그 내부에 포함된 "Command Prompt"로의 진입만 못하는 것뿐입니다.


자, 그럼 다시 복구 콘솔을 띄우고 싶다면 - 즉, 정상적인 Recovery partition을 만들려면 어떻게 해야 될까요? 한 마디로, "\Recovery\WindowsRE\Winre.wim" 파일이 있는 파티션을 만들어 주기만 하면 됩니다.

이를 위해 우선, "Disk Management" 관리 콘솔을 이용해 다시 해당 영역을 Primary 파티션으로 만들어 NTFS로 포맷해 줍니다. (물론, diskpart로 직접 파티션을 만들어도 됩니다.)

recovery_partition_3.png

보는 바와 같이 현재 F 드라이브로 할당되어 있습니다. 이제 winre.wim 파일만 구해주면 되는데, 이에 대한 방법은 다음의 글에 자세히 나옵니다.

Customize Windows RE
; https://msdn.microsoft.com/en-us/windows/hardware/commercialize/manufacture/desktop/customize-windows-re

정리해 보면, 우선 "d:\mount" 폴더를 만들고 설치 디스크로부터 /sources/install.wim 파일을 복사해 옵니다. 그다음, 아래의 명령어로 install.wim 파일의 내용을 마운트시켜 풀어줍니다.

md d:\mount\windows

Dism /Mount-Image /ImageFile:d:\mount\install.wim /Index:1 /MountDir:d:\mount\windows

위의 명령어가 실행된 후, "D:\mount\windows\Windows\System32\Recovery" 폴더를 보면 "Winre.wim" 파일이 있는데, 그 파일을 F 드라이브의 f:\temp 폴더에 복사해 줍니다. 그런 후, "Mount-Image" 시켰던 install.wim 파일을 다음의 명령으로 해제(unmount)해 줍니다.

Dism /Unmount-Image /MountDir:d:\mount\windows /Discard

(* 위의 명령이 실행되고 나면, d:\mount\windows 폴더 하위에 풀려있던 모든 파일들이 삭제됩니다.)

이제 reagentc.exe를 다음과 같이 실행해 줍니다.

F:\temp>reagentc /setreimage /path f:\temp\winre.wim
Directory set to: \\?\GLOBALROOT\device\harddisk0\partition4\temp

REAGENTC.EXE: Operation Successful.

그런 다음, "/enable" 옵션으로 다시 실행해 주면,

F:\temp>reagentc /enable
REAGENTC.EXE: Operation Successful.

temp 폴더에 복사했던 winre.wim 파일이 없어지고, 대신 f:\Recovery\WindowsRE 폴더가 생성된 후 그 안에 winre.wim 파일이 복사됩니다. 이 상태에서 reagentc /info로 복구 콘솔이 가능해졌는지를 확인할 수 있습니다.

F:\Recovery>reagentc /info
Windows Recovery Environment (Windows RE) and system reset configuration
Information:

    Windows RE status:         Enabled
    Windows RE location:       \\?\GLOBALROOT\device\harddisk0\partition4\Recovery\WindowsRE
    Boot Configuration Data (BCD) identifier: f411790a-10c3-11e7-b9ca-9b96daeebba1
    Recovery image location:
    Recovery image index:      0
    Custom image location:
    Custom image index:        0

REAGENTC.EXE: Operation Successful.

특이한 것은, harddisk0\partition4에서처럼 현재 4번 파티션으로 할당된 것을 볼 수 있습니다. 이는 Disk Management 관리 콘솔에서 파티션을 생성했을 때 정해진 것으로 diskpart에서도 4번이라고 나옵니다.

C:\Windows\system32>diskpart

Microsoft DiskPart version 10.0.14393.0

Copyright (C) 1999-2013 Microsoft Corporation.
On computer: TESTPC

DISKPART> list disk

  Disk ###  Status         Size     Free     Dyn  Gpt
  --------  -------------  -------  -------  ---  ---
  Disk 0    Online           64 GB  1024 KB        *
  Disk 1    Online           24 GB      0 B        *

DISKPART> sel disk 0

Disk 0 is now the selected disk.

DISKPART> list part

  Partition ###  Type              Size     Offset
  -------------  ----------------  -------  -------
  Partition 4    Primary            449 MB  1024 KB
  Partition 1    System             100 MB   451 MB
  Partition 2    Reserved            16 MB   551 MB
  Partition 3    Primary             63 GB   567 MB

상관없습니다. 재부팅하고 나면, 다시 다음과 같은 순서로 파티션 정렬이 됩니다.

  Partition ###  Type              Size     Offset
  -------------  ----------------  -------  -------
  Partition 1    Primary            449 MB  1024 KB
  Partition 2    System             100 MB   451 MB
  Partition 3    Reserved            16 MB   551 MB
  Partition 4    Primary             63 GB   567 MB

"reagentc.exe /enable" 명령어로 인해 이제부터 "복구 파티션"으로써의 기능이 실제로 동작하게 됩니다. 즉, 이 상태에서 "Advanced startup"으로 재부팅하면 정상적으로 X: 드라이브의 복구 콘솔로 진입할 수 있습니다.

'복구 콘솔'을 사용하기 위한 더 이상의 설정은 이제 '필요'하지 않습니다.

하지만, "F:\" 드라이브로 사용자가 언제든지 복구 파티션을 임의 접근할 수 있다는 것이 좀 걸립니다. 즉, 윈도우 설치 파일이 그랬던 것처럼 hidden 파티션으로 만들어 주고 싶은데요. 방법은, 파티션 타입을 Recovery로 바꿔주는 것으로 해결할 수 있습니다. 이를 위해 diskpart.exe를 실행하고, 다음과 같이 해당 파티션을 Recovery Partition으로 설정해 주면 됩니다.

DISKPART> list part

  Partition ###  Type              Size     Offset
  -------------  ----------------  -------  -------
  Partition 4    Primary            449 MB  1024 KB
  Partition 1    System             100 MB   451 MB
  Partition 2    Reserved            16 MB   551 MB
  Partition 3    Primary             63 GB   567 MB


DISKPART> sel part 4

Partition 4 is now the selected partition.

DISKPART> set id=de94bba4-06d1-4d40-a16a-bfd50179d6ac

DiskPart successfully set the partition ID.

위와 같이 해주고 나서, "Disk Management" 관리 콘솔로 확인해 보면 처음 지웠을 때와 동일한 복구 파티션으로 나타납니다.

boot_recovery_mode_1.png

물론, 취향에 따라 ^^ 저렇게 복구 파티션으로 굳이 지정하지 않아도 됩니다.


참고로, 이 글에서 복구 파티션에 할당한 winre.wim 파일은 그야말로 기본적인 환경만을 인식하는 윈도우 부팅 파일이라고 보시면 됩니다. 다시 말해, 특별한 장치들은 인식할 수 없습니다. 따라서, 복구 콘솔에서 인식하고 싶은 장치가 있다면 미리 winre.wim 파일에 device driver를 설치해 주어야 합니다. 이에 대해서는 다음의 글에 설명한 내용을 참고하시면 됩니다.

Windows 운영체제의 ISO 설치 파일에 미리 Device driver를 준비하는 방법
; http://www.sysnet.pe.kr/2/0/11190

그 외에, (UEFI 기반의 장치를 위한) 윈도우 설치 시 생성되는 기본 파티션들에 대한 설명을 다음의 글에서 찾을 수 있습니다.

UEFI/GPT-based hard drive partitions
; https://msdn.microsoft.com/en-us/windows/hardware/commercialize/manufacture/desktop/configure-uefigpt-based-hard-drive-partitions


끝맺기 전에, 주의 사항 하나 전달합니다. ^^

일반적인 PC인 경우 복구 파티션을 지우는 것은 크게 문제가 되지 않습니다. 하지만, 태블릿이나 소형 노트북 등의 경우에는 제조사가 미리 인식시켜야 할 장치에 대해 '복구 파티션'의 winre.wim에 장치 드라이버를 미리 설정해 놓은 경우가 있는데, 이를 삭제하게 되면 나중에 복구 콘솔로 들어갔을 때 (최악의 경우) 아무것도 못할 수도 있습니다.

가령, Dell Venue 8 Pro의 경우 델 측에서 미리 터치스크린과 가상 키보드를 장치 드라이버로 제공하게 되는데 "복구 파티션"을 지운 후 이 글의 방법에 따라 winre.wim 파일만 달랑 복사한 복구 파티션으로 복원하는 경우 복구 콘솔에서 터치스크린과 가상 키보드를 전혀 쓸 수 없는 상태가 됩니다.

Wednesday, September 09, 2015

Free VPN service

For overriding the internet connection block, VPN service can be considered.
Linux is one of the best choice for using VPN service both server and client.
here is the collection some links and information  I used for VPN.

https://openvpn.net/index.php/access-server/docs/admin-guides/182-how-to-connect-to-access-server-with-linux-clients.html

Installing an OpenVPN client:

Usually, the easiest way to install an OpenVPN client is to use the package management system for your particular Linux distribution.  Run one of the following commands (as root):

Fedora/CentOS/RedHat:


yum install openvpn

*NOTE: OpenVPN Access Server is not compatible with any version below the 2.1 OpenVPN Community/Linux client!
Ubuntu/Debian:


apt-get install openvpn

Once the openvpn package is fetched from the Internet and installed, run the client with the --version argument to make sure that it is version 2.1:
openvpn --version
OpenVPN 2.1_rc15e x86_64-unknown-linux-gnu [...]
[...]


Running the OpenVPN client with the downloaded client config file:

Usually, the easiest way to install an OpenVPN client is to use the --config argument to specify the location of the downloaded client config file:

openvpn --config client.ovpn

Caveats:

When a Linux/Unix client is used with Access Server, the Access Server is unable to alter the DNS settings on the client in question.


WIndows OS can use L2TP vpn service as default.
 http://freel2tpvpn.com/

Free L2TP VPN Account

VPN Type: L2TP VPN
US VPN Server: us.freel2tpvpn.com
               65.60.11.21
UK VPN Server: uk.freel2tpvpn.com
               77.92.87.171
VPN Username: vpn
VPN Password: freel2tp
VPN Secret  : freel2tp


Here is the list of free VPN services available.
http://www.vpngate.net/en/


http://www.vpngate.net/en/howto_l2tp.aspx

http://www.vpnbook.com/

Wednesday, March 11, 2015

windows 8.1 converting to GPT disk

windwos 8.1 was installed for BIOS+MBR type.
(one windows partion only, no EFI partion, windows RE partition, no MSR partition)

decide to change it into UEFI + GPT for boot speed.

here's the procedure that I followed.

1. download AOMEI  pro (for converting MBR disk into GPT without data loss, pro version is requreired)
    http://malwaretips.com/threads/aomei-partition-assistant-pro-edition-5-5-free-license-key-giveaway.20382/


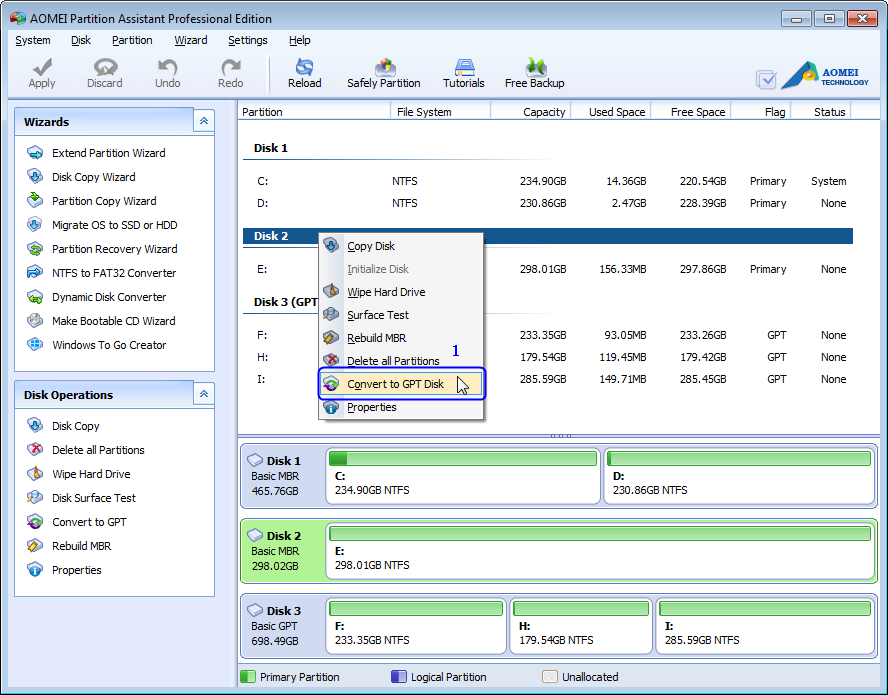
2. change disk 0 into GPT disk (EFI partion is created autiomatically)

Convert to GPT Disk
http://www.disk-partition.com/help/images1/convert-gpt-mbr-disk/convert-to-gpt-disk.png

3. resize windows partion for MSR (128 MB), windows RE(300 MB), and recovery image (over 1 GB)
https://technet.microsoft.com/en-us/library/hh825686.aspx


Diagram of EFI partitions with recovery

use the DiskPart tool to run the script that automates the configuration of the Windows RE Tools partition, the System, MSR, Windows, and recovery image partitions.
( I did just copied needed command and paste it into diskpart mode in command prompt. for me, blue colored command is needed)

rem == CreatePartitions-UEFI.txt ==
rem == These commands are used with DiskPart to
rem    create five partitions
rem    for a UEFI/GPT-based PC.
rem    Adjust the partition sizes to fill the drive
rem    as necessary. ==
select disk 0
clean
convert gpt
rem == 1. Windows RE tools partition ===============
create partition primary size=300
format quick fs=ntfs label="Windows RE tools"
assign letter="T"
set id="de94bba4-06d1-4d40-a16a-bfd50179d6ac"
gpt attributes=0x8000000000000001
rem == 2. System partition =========================
create partition efi size=100
rem    ** NOTE: For Advanced Format 4Kn drives,
rem               change this value to size = 260 ** 
format quick fs=fat32 label="System"
assign letter="S"
rem == 3. Microsoft Reserved (MSR) partition =======
create partition msr size=128
rem == 4. Windows partition ========================
rem ==    a. Create the Windows partition ==========
create partition primary 
rem ==    b. Create space for the recovery image ===
shrink minimum=15000
rem       ** NOTE: Update this size to match the size
rem                of the recovery image           **
rem ==    c. Prepare the Windows partition ========= 
format quick fs=ntfs label="Windows"
assign letter="W"
rem === 5. Recovery image partition ================
create partition primary
format quick fs=ntfs label="Recovery image"
assign letter="R"
set id="de94bba4-06d1-4d40-a16a-bfd50179d6ac"
gpt attributes=0x8000000000000001
list volume
exit
If you use the recommended DiskPart script, end users do not see the Windows RE Tools partition and the recovery image partition in File Explorer. However, they can see and remove the recovery image partition by using disk management tools.
If you want to prevent end users from removing partitions by using disk management tools, you can add the following DiskPart command to the script when you create a partition.
gpt attributes=0x8000000000000001
 
4.  deploy Windows® Recovery Environment (Windows RE)
 
https://technet.microsoft.com/en-us/library/hh825221.aspx
 
Create a new directory in the Windows RE Tools partition, and then copy your custom Windows RE tools image (Winre.wim)
mkdir T:\Recovery\WindowsRE
xcopy /h W:\Windows\System32\Recovery\Winre.wim T:\Recovery\WindowsRE 
 where T: is the drive letter of your Windows RE Tools partition
 
 Register your custom Windows RE tools image:
C:\Windows\System32\Reagentc /setreimage /path T:\Recovery\WindowsRE /target W:\Windows
 
Optional: If you have added a custom tool to your Windows RE boot image, register it so that it will appear on the Boot Options menu:

Reagentc /setbootshelllink /configfile E:\Recovery\BootMenu\AddDiagnosticsToolToBootMenu.xml
Optional: Configure a hardware recovery button (or button combination) to run a secondary boot path that contains Windows RE
In Notepad, create a text file that includes commands to identify and hide the recovery partitions. The following examples are based on your firmware type:
UEFI:
Use the ID: PARTITION_MSFT_RECOVERY_GUID (de94bba4-06d1-4d40-a16a-bfd50179d6ac) to define the partitions as recovery partitions.
Use the GPT attributes: 0x8000000000000001 to hide the drive letters and to mark them as required, by using a combination of two attributes: GPT_BASIC_DATA_ATTRIBUTE_NO_DRIVE_LETTER and GPT_ATTRIBUTE_PLATFORM_REQUIRED.

rem == HideRecoveryPartitions-UEFI.txt
select disk 0
select partition 1
remove
set id=de94bba4-06d1-4d40-a16a-bfd50179d6ac
gpt attributes=0x8000000000000001
rem == If Push-button reset features are included, add the following commands:
rem    select partition 5
rem    remove
rem    set id=de94bba4-06d1-4d40-a16a-bfd50179d6ac
rem    gpt attributes=0x8000000000000001
list volume
Run the diskpart script to identify and hide the recovery partitions:
 
 
Diskpart /s E:\Recovery\HideRecoveryPartitions-.txt 
 
https://www.winhelp.us/custom-recovery-image-in-windows-8.html

enter the following command: recimg -CreateImage \RefreshImage . Replace the variable with the drive where you want to store the image. For example, recimg -CreateImage C:\RefreshImage stores the image on system drive, in new folder named RefreshImage.

Type recimg /showcurrent and press Enter key.
If the last line is "Operation completed successfully", you are ready to go. But if you see error 0x80070490 and message "There is no active custom recovery image", the image is unavailable. Connect your external drive and try again after about 10 seconds.

Sometimes you might want to deregister an image created by someone else - it might be the image provided by your computer manufacturer (that normally includes tons of useless programs) or maybe you bought a used PC.
Again, open elevated Command Prompt - open Start screen (use Windows Key), type "cmd" and click Command Prompt while holding down Ctrl and Shift keys.
Type recimg /deregister and press Enter. Please remember that the custom image file or folder will not be deleted.
If you want to register an existing custom recovery image (you must do that after using Refresh your PC feature), type recimg /setcurrent \RefreshImage\ and press Enter. As usual, replace the variable with the letter of the drive the image is on.

How to restore a Custom Recovery Image

Custom Recovery Images can be restored with the Refresh Your PC process. Just plug in the drive where you keep the custom image, use keyboard shortcut Windows Key+I (touch-screen users can swipe in from the right side of screen and tap Settings) to open Settings Charm and click or tap Change PC Settings in the bottom of the bar.
Windows 8 users should open General tab on the left and click Get started in the Refresh your PC without affecting your files section.
In Windows 8.1, open Update & recovery tab on the left, then open Recovery tab and click Get started in the Refresh your PC without affecting your files section.
Then follow instructions in Step 3 section of the Repair your computer in Windows 8 and 8.1, page 2 tutorial.
If Windows is not able to boot, you can use Windows installation DVD or Recovery Drive to launch Refresh Your PC.


Tuesday, February 03, 2015

Adobe lightroom freeze after deteting video file

While importing the catalog in Lightloom, preview and importing hangs.
Don't know why it happens.

But, after googling for a while I found one clue.
follwing two Adobe's service should be loaded for solving this problem.
1. DynamicLinkMediaServer.exe
2.  DynamicLinkManager.exe

Make sure that these two files are executed.

You may re-generate symbolic link (*.lnk) of these files.
Two executables are located in below path.
%Lightroom folder%\Helpers\DynamicLinkSupport\dynamiclink\CS6\dynamiclinkmanager.exe
%Lightroom folder%\Helpers\DynamicLinkMediaServer\dynamiclinkmediaserver\1.0\dynamiclinkmediaserver.exe

Option B – Disable UAC Through Group Policy

This is the method that should be used by administrators wanting to disable UAC across several computers at once.
This can be done via Local Group Policy or via Active Directory-based GPO, which is much more suited for large networks where one would like to disable UAC for many computers at once.
If using Local Group Policy you’ll need to open the Group Policy Editor (Start > Run > gpedit.msc).
If using in AD-based GPO, open Group Policy Management Console (Start > Run > gpmc.msc) from a Windows Vista/7/2008 computer that is a member of the domain. In the GPMC window, browse to the required GPO that is linked to the OU or domain where the computers are located, then edit it, or, if needed, create a new GPO.


In the Group Policy Editor window, browse to Computer Configuration > Windows Settings > Security Settings > Local Policies > Security Options.

 
Make the following changes:
  • User Account Control: Behavior of the elevation prompt for administrators in Admin Approval Mode – Set its value to Elevate without prompting.
  • User Account Control: Detect application installations and prompt for elevation – Set its value to Disabled.
  • User Account Control: Only elevate UIAccess applications that are installed in secure locations – Set its value to Disabled.
  • User Account Control: Run all administrators in Admin Approval Mode – Set its value to Disabled.

Restart the computer when done.

Option C – Disable UAC Through the Registry

Another method to disable  UAC is through the computer’s Registry.

Click Start, click Run, type regedit, and then click Enter.
If prompted to enter your credentials by UAC, do so and/or press Yes to continue.
Navigate to the following registry subkey:
In the details pane, locate the EnableLUA key (REG_DWORD type).
On the Edit menu, click Modify. In the Value data box, type 0 (zero), and then click OK.

Exit Registry Editor, and then reboot the computer.

Wednesday, December 14, 2011

android camera shutter sound off

http://androidforums.com/motorola-droid/30759-turn-off-camera-shutter-sound.html


Easy to do Actually!

Remove the camera_click.ogg file from your phone.

You must be rooted to do this but you can do this using ADB Shell or Terminal Emulator. Make sure to change /system to RW first.
ADB shell
SU
mount -o remount,rw /dev/block/mtdblock4 /system
mv /system/media/audio/ui/camera_click.ogg /system/media/audio/ui/camera_click.ogg.old

Done!!! No more Clicking sound

There are a few programs on the market that allow you access the file on root as well through a GUI if your not comfortable using command lines.

Thursday, November 24, 2011

Mount NTFS or USB disk in single mode boot

http://www.insanelymac.com/forum/index.php?showtopic=232365


Snow Leopard 10.6.4

Recently I had a situation where I couldn’t get into the GUI (even with safe mode –x). I knew I had to replace a certain file on the root with a file I had stored on another drive. Now if this was DOS, it would be trivial to copy the file over – not so in OS X.

In order to use the mount command, we first need to know three pieces of information.
1. The name of the drive we want to mount (what do we call it?)
2. The type of file system that drive uses.
3. The folder we are going to mount the drive in.

First we need to enter Single User Mode. For Chameleon-type hackintosh bootloaders, hit any key then type –s enter. For legit Mac users I think you hold Apple and s key as you boot.

After booting, somewhere on the screen, you should see a line similar to this:
BSD root: disk0s1, major 14, minor 1
This tells us that we are currently on disk 0, partition 1 (ignore the major, minor).

You can now go ahead and enter the two commands listed on the screen.
fsck –fy
mount –uw /

The first command will check your disk for errors and the second will give you write access to the root. You now need to be EXTREMELY CAREFUL about making inadvertent or damaging changes to root.

We need to know what the computer has called our drives and partitions. We use the ls command (similar to dir in DOS).
ls –l /dev/disk*

We get some output which contains something like this:
/dev/disk0
/dev/disk0s1 <-- we know we are on this partition
/dev/disk0s2
/dev/disk1
/dev/disk1s1
/dev/disk1s2 <-- the file we want is here (we think)

Note this list seems to change and there is no guarantee that partitions named in the GUI using diskutil will have the same names here. Also CD’s and DVD’s take a while to show up sometimes so just repeat the command (use up arrow) until they do.

Check the file system used by the drive we want to mount. In my example it is a Windows NTFS partition.
fstyp /dev/disk1s2
ntfs <-- ok that’s what we expected

Now we create a folder to mount the drive to. For easy access let’s make a folder on the root called “drive2”.
mkdir /drive2

Now it’s time to use all this information in the mount command
mount –t ntfs /dev/disk1s2 /drive2

With some luck it worked. We check to see if our files and folders are there.
ls –l /drive2

If the device was a HFS/HFS+ volume (Mac OS) then we would use this command:
mount –t hfs /dev/disk1s2 /drive2

USB hard drives and flash drives would use similar syntax depending on what file system the device was formatted with eg. NTFS (windows), HFS (mac), MSDOS (older / smaller usb sticks).

For a CD…
mount –t cd9660 /dev/disk1s2 /drive2

For a DVD…
mount –t udf /dev/disk1s2 /drive2
if this doesn’t work then try the cd9660 switch as if it was a CD.

Mounting a Samba network share does not seem to work in Snow Leopard 10.6.4.

At this point you should be able to do the things you wanted to do (cp files etc.). Note, HFS drives are mounted with WRITE ACCESS by default even if the root is read-only (use -r switch if you want to mount read-only). NTFS drives are mounted as read-only and there is no native support for write access.

We can unmount the device using this command (note spelling of “umount”):
umount /dev/disk1s2

When you are finished, use the reboot or shutdown command. DO NOT use the exit command which will continue booting into GUI.

NOTE: Please do not reply to this thread to troubleshoot your problems. I'm not an expert, I just taught myself what I needed to know to get the job done. Single User Mode has an excellent man command (short for manual). This is the best way to teach yourself. Also look in the /sbin folder for variations of the mount command for other file systems.

If you have something useful to add, for example you know how to get SMB shares to mount, then please contribute.

Monday, November 21, 2011

Modify Chameleon boot loader

After installing os X in PC, chameleon boot loader was installed as default.
It looks charming and I decided to use it.

But one thing left not resolved.
Windows 7 is my primary OS but this loader choose snow leopard as default os.

The way to change the default OS in chameleon was found in follwing location.

http://www.insanelymac.com/forum/lofiversion/index.php/t160689.html
Modify your com.apple.Boot.plist to contain the following:

Default Partition
hd(x,y)

where X is the drive and Y the partition.

Sunday, November 20, 2011

Hackintosh 10.6.6

Just installed hazard snow leopard 10.6.6.
First I tried to update from IOAK 10.6.2 but don't know how to upgrade it safely.
So I decide to reinstall it.

Install process was successful.
While installing, customizing it with PCEFI, NVinjector, NVenabler, AppleAzailla, etc.

But after the install, first boot was failed.

in the verbose boot I found that AppleIntelCPUPowerManagement.kext cause the kernel panic.

kernel panic message read like this;


Debugger called:
Backtrace (CPU 1), Frame : Return Address


Kernel Extensions in backtrace(with dependencies):
com.apple.driver.AppleTyMCEDriver(1.0.1dB)@0x2f5c8000->0x2f5d0fff
dependency: com.apple.iokit.IOPCIFamily(2.6.3)@0x2f922000
dependency: com.apple.driver.IOPlatformPluginFamily(4.0.1d0)@0x35b13000
dependency: com.apple.iokit.IOACPIFamily(1.3.0)@0x2f905000


Following solution was found through google search.

http://www.insanelymac.com/forum/index.php?showtopic=65137&mode=threaded&pid=461289

Try to remove "AppleIntelCPUPowerManagement.kext".

In terminal:
mount -uw /
sudo rm -R /System/Library/Extensions/AppleIntelCPUPowerManagement.kext
sudo rm /System/Library/Extensions.kextcache
sudo rm /System/Library/Extensions.mkext

Then repair permissions and reboot.

Here is the another solution'

http://www.insanelymac.com/forum/lofiversion/index.php/t220378.html

Boot in single user:
mount -uw /
rm /System/Library/Extensions/AppleTyMCEDriver.kext


http://www.hackint0sh.org/f200/43669.htm


[Solution] System Hangs on ACPI_SMC_PlatformPlugIn

If you had this hangs/freeze with this component call, have this sollution:

-

Boot your PC.

Pressing F8 repeatedly.

You see Darwin prompt, now type -S (Enter)

Now, you see something lines, bla bla bla and a prompt.

Now, type:

/sbin/mount -uw / (Enter)

rm -rf /System/Library/Extensions/AppleSMC.kext (Enter)

rm -rf /System/Library/Extensions.mkext (Enter)

rm -rf /System/Library/Caches/* (Enter)

reboot (Enter)

Pressing F8 repeatedly. (Again)

In Darwin prompt, type -v (Enter) (this for verbose mode)

See it boot fine without errors.

Goodluck,

Tuesday, September 06, 2011

Canon PIXMA MP150 error

My printer -canon MP150 - was gone because of failed color ink cartridge.
LED shows E5 error code continuously.
So I decided to use this machine as scanner without printing.

Thanks to FixYa
http://www.fixya.com/support/t545498-error_e5

when the error E5 is ocured it means the COLOR cartridge is either the WRONG cartridge, or you have a balck cartridge in the color cartridges spot. Please verify you have the correct cartridges in the correct locations, and that you may not have installed the black in the colors location. Please let me know if this fixes your problem. Thanks //D


http://www.fixya.com/support/t1781424-canon_mp145_stop_error_e5_use_scanner

THIS SOLUTION FOR PEOPLE WHO CANNOT RESET THEIR OWN PRINTER LIKE ME

hi, now i got a solution how to SCAN if your printer have E-5 error or something. First u must remove the both cartridge from your printer and make sure u connect your printer to your computer, after that, do this

With the printer powered off but connected to a power source, press the Power button while pressing and holding the Stop/ Reset button.

When the Power is lit, press the Stop/Reset button two times while pressing and holding the Power button.

And then you will see no error in your printer (the LED shows number 1,and the alarm is in green)

NOW U CAN SCAN USING MP NAVIGATOR!

Thursday, May 06, 2010

Ubuntu 10.04 lucid server

Just right after the release of ubuntu 10.04 lucid, I installed it in my computer.
This time, it is a server, not a desktop version.

It was exactly what I expected!

no graphics, no eye-candy stuff.

very simple and very fast.

But I got a problem after installing it.

Until the version 9.10, ubuntu used ext3 as default file system.
But it was changed into ext4 file system in 10.04.
Without any prior information of new version I put the server CD in my cd-rom.
after the clean install, I mounted all my old partions.
I seems working perfectly.

In the next I found that the server was down and tried to reboot it.
it stucked in fsck while boot up.

I tried and tried with no success.

After failing hundred of tries, I started google.
The error message was "ureadahead-other main process terminiated..".
It was told that this message is involved in data cache or file system read.
Then I checked the release note of ubuntu 10.04 lucid.

I found that default file system was changed to ext4.

consequently I google to know how to recover and convert the filesystem.

The asnswer i fouind was the following commands.

root@server# fsck.ext3 -pf /dev/sdd2
/dev/sdd2: 238/9158656 files (39.5% non-contiguous), 19796871/36634224 blocks
root@server# tune2fs -O extents,uninit_bg,dir_index /dev/sdd2
tune2fs 1.41.11 (14-Mar-2010)

Please run e2fsck on the filesystem.
root@server# tune2fs -O extents,uninit_bg,dir_index /dev/sdd2
tune2fs 1.41.11 (14-Mar-2010)

root@server# fsck /dev/sdd2
...
Group descriptor 1113 checksum is invalid. FIXED.
Group descriptor 1114 checksum is invalid. FIXED.
Group descriptor 1115 checksum is invalid. FIXED.
Group descriptor 1116 checksum is invalid. FIXED.
Group descriptor 1117 checksum is invalid. FIXED.
/dev/sdd2 contains a file system with errors, check forced.
Pass 1: Checking inodes, blocks, and sizes
Pass 2: Checking directory structure
Pass 3: Checking directory connectivity
Pass 4: Checking reference counts
Pass 5: Checking group summary information
/dev/sdd2: 238/9158656 files (39.5% non-contiguous), 19796871/36634224 blocks

Actually above /dev/sdd2 partition was lost by wrong mounting option in /etc/fstab.
While its file system is ext3, I write its filesystem as ext4 in /etc/fstab.
This must be my biggest mistake and carelessness.
I believe this small mistake makes whole system fault.

After the failure, /dev/sdd2 partion was lost.
fdisk command shows that sdd2 is not partitioned.

to recover the filesystem, I used parted command.

root@server# parted /dev/sdd
Welcome to GNU Parted! Type 'help' to view a list of commands.
(parted) unit
Unit? [compact]? cyl
(parted)print
Model: ATA Hitachi HDT72502 (scsi)
Disk /dev/sdd: 30401cyl
Sector size (logical/physical): 512B/512B
BIOS cylinder,head,sector geometry: 30401,255,63. Each cylinder is 8225kB.
Partition Table: msdos

Number Start End Size Type File system Flags
1 0cyl 12157cyl 12157cyl primary ext4

(parted) rescue 12158 30401

With this three command, I recovered the ext3 partition again!

and next, I converted it into ext4 then I use it flawlessly.

Friday, June 12, 2009

Migrating linux server

There is a small, tiny server running for small community.
It's running 24 hours, 7 days in my closet. ;-)
The server is operated in ubuntu linux.
Main purposes of this are sharing files through ftp, running small board, downloading from torrent, remote access from the office through secret ssh port, sharing files through samba.
Yes, It is doing a lot of work as small home server.
but hardwares running linux are not so powerful.
celeron 1GHz, 512 Mb memory, and harddisks of 10Gb, 80 Gb, and 80 Gb.
(VIA 694 chipset)

One of my collegue gave me a old computer.
It has Celeron 2.6 GHz (!), 256 Mb memory, and 40 Gb harddisk.
(Intel i845G chipset)

So I decide to migrate my old server to new -actually it is not a new one - machine.

This is my personal recording of migration process.

1. Intall Ubuntu linux from 8.10 CD.
2. Upgrade ubuntu linux from 8.10 to 9.04 through dist-upgrade.
3. Configure APM (Apache2, PHP5, MySQL5 )
4. Install additional softwares
(proftpd, openssh, telnetd, webalizer, phpmyadmin, mc, squid)
5.

Tuesday, May 19, 2009

Remote access to linux machine through firewalled network

I'm running my linux machine at home as well as windows PC.

this morning I left my PC in power-on condition because some backup work should be done. But i will still be in power-on condition after the backup work done, that is the waste of energy. but I can turn it off because I'm working in my office.

So I tried to connect to my windows machine via linux computer which runs 24 hours a day. It is possible to use remote desktop service runs on Vista.

Only remaining problem is a running X windows program in my office PC.
It need some trick called ssh tunneling.

I installed Xming to run X server in my office PC.
to run the X application, i use plink.exe which installed with putty ssh client.

Method is very simple.
First, start the Xming server in my office PC.
And start command console in same machine.
move to the folder putty is installed.
and type plink and some connection info.

here's my case.

C:\PROGRA~1\iPuTTY>plink -ssh -X -P 27 -pw aaa user@mylinuxpc.com xterm

(note: -P 27 is option for non-regular port number.
this option is required because my company block official ssh port(22) so I changed ssh port to 27 in my linux machine.)
then I can use any linux X application through this xterm.

I started tsclient program and tried to connect to my vista machine.

Saturday, April 04, 2009

Boot with grub, Vista, Ubuntu, OS X

I'm not sure which method can valid for my PC.
it seems kind of complicate concept such as efi_boot, vanilla kernel, guid, pc_bcd..

But i just downloaded 'boot_v9' and copy it into /boot directory in my ubuntu partition.
and added following paragraph in the /boot/grub/menu.lst

title Mac OSX Leopard
#root drive should be the partion which grub is installed. It's not where OSX intalled partition!!!!
root (hd1,2)
kernel /boot/boot_v9
boot
o

then It just work!!
http://www.insanelymac.com/forum/index.php?showtopic=85508

Now that boot_v9 supports sleep, I have revived this method.
Get boot_v9 from here:
http://www.mediafire.com/?rdonkiqyzlz

Rename it from boot to boot_v9

Follow the PC_EFI method below, except say boot_v9 everwhere it says boot_v8

[Important Edit regarding depreciation -- While the PC_EFI method works, and was necessary for those of us who used grub at one time, with the advent of Chameleon I consider it depreciated.]

CHAMELEON METHOD
To use Chameleon with Grub, do the following:
1) Download Chameleon (current version) from chameleon.osx86.hu
2) dd boot1h to the partition you have OS X installed onto.
3) copy boot to the root directory of your OS X partion
4) ignore the boot0 file -- it overwrites grub in your MBR and you don't need it with grub.
5) edit your grub menu.lst file to chainload in the usual manner, I.E.-- my OS X entry now reads:

title Mac OSX Leopard
rootnoverify (hd?,?) (replace ? with the values Grub uses for OSX partition -- differs from pc_efi method)
chainloader (hd?,?)+1 (same values)

This is much easier and more standardized, hence I consider the following pc_efi method depreciated.

PC_EFI METHOD

[EDIT -- this is intended for MBR partitioning. If you used GUID, see keso7's post below also
http://forum.insanelymac.com/index.php?s=&...st&p=859014
Linux lives nicely in the extended partition of an MBR system. FreeBSD will put its own slices in an MBR primary partition.]

Get boot_v8 (The pc_efi bootloader)
(Google "pc_efi v8.0 download")

Copy it to /boot inside linux [EDIT -- or FreeBSD]

Then edit /boot/grub/menu.lst

title Mac OSX Leopard
root (hd?,?) (replace with same values grub uses for Linux partition, not ones for OSX partition)
kernel /boot/boot_v8
boot

[EDIT -- Repetition because so many people miss this point -- use root(hd?,?) to match your LINUX entry. DO NOT point to your OS X partition. If you screw this up you will get grub error 17.]

[EDIT -- a few people report kernel /boot_v8 works for them rather than above. Possibly a difference between SUSE (which I use) and Ubuntu on the reports. In any event, if you put boot_v8 into the same location as the Linux kernel (for me /boot) the the path should be the same as the path to the Linux kernel in the Linux entry.]

[EDIT -- for FreeBSD, the root line would be root(hd?,?,a) -- the a refers to the first (boot) slice in the FreeBSD partition]

If OS X resides on a different HDD than Linux, you will have to enter a hex code for the appropriate drive during the boot process. [For simplicity, I advise you have Linux and OS X share a hard disk.]
80 -- 1st HDD
81 -- 2nd HDD
82 -- 3rd HDD

Alternately, so you don't have to enter code during boot process, make a tiny ext3 partition on the OS X HDD
copy boot_v8 there in a directory /boot
and replace (hd?,?) with the values of that partition

[EDIT -- At least theoretically, you should be able to do the same approach with Grub hosted on a Solaris system. However Solaris does not support my disk controller (ICH8R) so I cannot test this myself.]
=====================================
thanks to jesse wilkinson
http://linagra.com/2009/03/osx86-triple-boot-vista-ubuntu-grub-working-efi/
http://www.jessewilkinson.com/2008/02/14/triple-boot-vista-ubuntu-710-osx86-1051/

Triple Boot: Vista, Ubuntu 7.10, OSX86 10.5.1
February 14th, 2008

Filed under: Development, Hardware, High Technology

This is a step-by-step how-to of how exactly I set up my triple booting system on a PC. I used two hard drives for this configuration, one 400GB for my Vista + Ubuntu, and another 120GB for my OSX86 partition. This cleans up a lot of problems with getting the EFI bios to work.

Gateway GM5442

My hardware configuration:
-Intel Core 2 Duo E4400 (2.0 GHz)
-2GB DDR2 533MHz
-500GB + 120 GB SATA HD’s
-Board: Intel D945GCF
-Chipset: 82945G
-Intel GMA 950 Graphics
-10/100 Mbps Lan (Works on Vista + Ubuntu, not osx86)
-Integrated 8-Channel Sigmatel Audio (Works on Vista + Ubuntu, not on osx86)
-USB 2.0 Bluetooth Adapter (Works on Ubuntu + osx86, not on Vista)
-USB 2.0 Ethernet Adapter (Works on osx86, not on Vista + Ubuntu)
-USB 2.0 Audio Adapter (Works on osx86 + Vista, not on Ubuntu)

1. You will need:

* A PC with the same board/chipset/graphics for this install to work. A lot of computers come standard with this configuration.
* A copy of the Kalyway patched 10.5.1 OSX86 Install DVD.
* A copy of Ubuntu 7.10 (http://www.ubuntu.com)
* Any copy of Windows Vista (or xp really)
* Two (2) Hard drives! HIGHLY RECOMMENDED, makes life much easier and you don’t risk destroying your other partitions when installing OSX86.

2. Make sure both drives are attached by sata, configure your prefered vista drive as primary in your BIOS and go ahead and install it on your primary drive if you haven’t already.
3. When you’re done, use Vistas “disk management” tool under “computer management” in the “administrative tools” section of the control panel to free up some space in an additional partition for an Ubuntu install on your Vista Drive.
4. Insert your Kalyway disc and restart your computer, before the install starts jump into your BIOS.
5. Configure your hard drives so that your OSX hard drive will be primary instead of your vista drive. Exit + Save
6. Kalyway disc will start, allow the disk to load, it may take a few minutes. Patience is a virtue!
7. STOP, do not continue your installation yet, you need to partition!
9. Go to tools > disk utility and select your OSX hard drive from the left hand list.
10. Click the partition tab, and select 1 partition. Name your partition something simple, I used “osx”. DON’T USE SPACES. Choose MacOS Extended (Journaled) Filesystem. Do not click “apply” yet.
11. Choose “options” > this screen will appear:

MBR

12. For this hardware configuration only MBR will work with the EFI bios for this chipset. I’ve tried GUID, as it works better on intel processors, but nevertheless, no luck.
13. Click apply and complete the partitioning, close disk utility.
14. Continue the installer, agree to the terms + conditions. You will see a customize button before you click on “Install.” Click this option.
15. Check both the vanilla kernals and the EFI bootloader(MBR not GUID) at the bottom. I couldn’t get any of the sound drivers to work on my onboard sound, but i resolved the issue with a USB sound card (see bottom).
16. Click “done” and continue with the install.
17. When it’s all said and done, you should be able to restart and boot into OSX86 without the disc in the drive.
18. Eject the disc, and insert your Ubuntu 7.10 disc.
19. Restart the computer, and head into BIOS.
20. Reset your Vista drive as your primary hard drive. Save + Quit
21. When prompted to start ubuntu live cd, do so.
22. Once on the Ubuntu desktop, click install and follow the basic instructions. Use “largest continuous free space” for the space to install, and it will install to the empty partition on your vista drive you created in step 3. MAKE SURE YOU INSTALL GRUB BOOTLOADER!
23. Complete the install, eject Ubuntu disc, and restart.
24. When prompted with the Grub bootloader, choose Ubuntu 7.10 and boot into your linux partition.
25. Open up a new terminal and type in: “sudo fdisk -l” (confirm with password)
26. It should display a list of hard drives and their partitions, this will give you an idea of how you’ll need to configure GRUB, to boot into your OSX and Vista partitions. Keep this terminal open!
27. Open another terminal and type: “sudo gedit /boot/grub/menu.lst” (confirm with password)
28. In front of you a gedit window will appear with the current Grub configuration. You’re going to have to add some new entries to this setup.
29. This is what my menu.lst file looks like, yours should look very similar, however you’re partitions may be labeled differently. Replace “root (hdX,Y)” as needed to make it match what you have displayed in the terminal you opened in step 25 + 26.

default 0
timeout 5

title Mac OS X86
root (hd1,0)
chainloader +1
makeactive

title Windows Vista
root (hd0,1)
chainloader +1
makeactive

title Ubuntu 7.10, kernel 2.6.22-14-generic
root (hd0,2)
kernel /boot/vmlinuz-2.6.22-14-generic root=UUID=c50989a9-f628-48e8-90f7-d8b3836d6bc2 ro quiet splash
initrd /boot/initrd.img-2.6.22-14-generic
quiet

title Ubuntu 7.10, kernel 2.6.22-14-generic (recovery mode)
root (hd0,2)
kernel /boot/vmlinuz-2.6.22-14-generic root=UUID=c50989a9-f628-48e8-90f7-d8b3836d6bc2 ro single
initrd /boot/initrd.img-2.6.22-14-generic

title Ubuntu 7.10, memtest86+
root (hd0,2)
kernel /boot/memtest86+.bin
quiet

30. Once you’re sure you’re good, save and restart. The configuration I put in above should work beautifully with OSX being primary, Vista/XP secondary, and Ubuntu tertiary. ENJOY!

Extras I had to buy later:
- USB audio adapter (works out of the box) http://www.newegg.com/Product/Product.aspx?Item=N82E16829128002
- USB ethernet adapter (works with drivers on this page) http://www.newegg.com/Product/Product.aspx?Item=N82E16833114017
- USB bluetooth adapter(works out of the box) http://www.newegg.com/Product/Product.aspx?Item=N82E16833156069

Photos:
About the macStacks!StatsDesktop (Artifacts too…)hardware acceleration!All three os’s

Videos:
- Youtube video of my setup: http://www.youtube.com/watch?v=y1VD2lXpcZ0 (sorry it’s so quiet!)
Share:

* Digg
* del.icio.us
* Facebook
* Google
* Reddit
* Slashdot
* StumbleUpon

2 Responses to “ Triple Boot: Vista, Ubuntu 7.10, OSX86 10.5.1 ”

1.
Andres
March 17th, 2009 at 1:06 pm

I see you made this a year ago. I just won a very powerful PC on a contest for video editing but I want to experiment running OSX on it. Here are my PC specs:
# Ram: 12GB
# CPU: Intel Core i7 Processor i7-920 2.66GHz
# Case: Antec 900 Series
# DVD Drive: CD - DVD Drive
# Power Supply: Trio 650 Watt TruePower
# Operating System: Vista Ultimate 64 Bit
# Video Card: Radeon HD 4870 512MB 256-bit GDDR5
# Firewire Card: 32/64-Bit 3 Ports 1394
# System Drive: 250 GB SATA 7200 RPM
# A/V Storage: 2 TB SATA 7200 RPM

I’d like to use a firewire external hard drive to install it. On your blog you mentioned using “Kalyway patched 10.5.1 OSX86 Install DVD.” Is there any upgrades ever since you did this? Do you think it’ll work on an external HD? I could also install it on a external eSata HD, what I don’t whant is to mess with the original configuration the system came with.(other than the BIOS).
Thanks beforehand for any advise you can offer.
2.
Jesse Wilkinson
March 19th, 2009 at 1:05 pm

Wow, I wish I could win a computer that rediculous… You should try the iPC distribution, it may work out of the box, although I’m not sure if OSX even supports core i7 chipsets yet.

http://pcwizcomputer.com/ipcosx86/

You’ll have to search “the bay” to find the download, it’s a dvd.

Also you should do your research on insanelymac.com. The easiest way to search that site is to use google with the site:insanelymac.com parameter.

You can use this link for that:

http://www.google.com/search?q=core+i7+site%3Ainsanelymac.com

Good luck man

Thursday, December 11, 2008

Sky HDTV in ubuntu 8.10

For seeing the QAM Digital broadcating, sky HDTV program is required.
but it's runs only on Windows.
Even Windows Media Center does not capture the QAM channel in korea.

If you are using a linux, you can see the digital TV for free.

1. Set the driver

Someone saying that following configuration option shold be added in /etc/modprobe.d/options

options cx88xx card=31 tuner=64

options snd_hda_intel index=0
options cx88-alsa index=1
----------------
That someone also saying that /etc/modprobe.d/aliases should add these;
alias char-major-116 snd
alias char-major-14 soundcore

alias sound-service-0-0 snd-mixer-oss
alias sound-service-0-1 snd-seq-oss
alias sound-service-0-3 snd-pcm-oss
alias sound-service-0-8 snd-seq-oss
alias sound-service-0-12 snd-pcm-oss
alias /dev/dsp snd-pcm-oss
alias snd-card-0 snd_hda_intel
alias sound-slot-0 snd_hda_intel

alias sound-service-1-0 snd-mixer-oss
alias sound-service-1-3 snd-pcm-oss
alias sound-service-1-12 snd-pcm-oss
alias /dev/dsp1 snd-pcm-oss
alias snd-card-1 cx88-alsa
alias sound-slot-1 cx88-alsa

BUT, another one saying that only followings are needed for it.
/etc/modprobe.d/options
options cx88xx card=31 tuner=64


/etc/modprobe.preload
cx8800
cx88xx
cx88_dvb


2. install kaffeine
sudo apt-get install kaffeine
or you can enjoy the HDTV by using mplayer or xine.

Choose as you want.

3. Setup the channel
You need the programs scandvb, tzap and szap to scan transponders and to tune the cards. These are packaged in Fedora as 'dvb-apps' in Fedora Extras and 'dvb-utils' in Ubuntu (and thus probably Debian)
In ubuntu 8.10 you can install dvd-utils by
#apt-get install dvb-utils

then you can use the scan command.
config files for dvb-utils are stored in /usr/share/doc/dvb-utils

Korea use a ATSC like US, so don't confuse with several DVB options.
(there are 4 options ; ATSC, dvb-s for satellite, dvb-c for cable, dvb-t for terrestrial)


so use scan command for atsc.
scan /usr/share/doc/dvb-utils/examples/scan/atsc/us-Cable-Standard-center-frequencies-QAM256 > channels.conf <= cable
scan /usr/share/doc/dvb-utils/examples/scan/atsc/us-ATSC-center-frequencies-8VSB > channels.conf <= air TV

* if you using another linux distribution, you may need to use dvbscan instead of scan.
here is the format of channels.conf

ChannelName:Frequency:Modulation:VID:AID:PID
MBC:755028615:8VSB:17:20:1
KBS1:761028615:8VSB:33:36:1
KBS2:767028615:8VSB:33:36:1
EBS:773028615:8VSB:33:36:1
SBS:797028615:8VSB:17:20:1

check the channel with azap
# azap -r MBC


Copy the channel file to TV application directory.
for kaffeine : ~/.kde/share/apps/kaffeine/channels.dvb
for Mplayer : ~/.mplayer/channels.conf
for Xine : ~/.xine/channels.conf

especially for using in kaffeine, you need to compile atsc-convert.
download source from http://websvn.kde.org/branches/work/~pfister

atsc-converter channels.conf > channels.dvb

Monday, September 15, 2008

split MKV

http://stream-recorder.com/forum/split-mkv-mpeg-4-avc-hdtv-file-t2270.html?s=21dcc10b0306a6cda1b8e97162b1642c&

Recently I got an .MKV HDTV file with MPEG-4 AVC (h264) video and two AC3 audio tracks. The bad thing was that the .MKV file was 10MB larger than a single layer DVD disc, i.e. it was 4,38 GB instead of 4,37GB I could fit into the DVD disc.

The problem was that many applications still didn't support files larger than 4,37. Also MPEG-4 AVC (h264) is not always supported even with a single audio track.

I didn't want to re-compress the video. Splitting MKV was the only option. Luckily the video had a dozen of useless seconds at the end.

I tried freeware avidemux (Windows) first. It was slow, didn't seem to support 2 audio tracks, besides I got several dialog windows asking me about indexing and other stuff that I didn't really want to see.

Then I tried freeware mkvtoolnix (Windows, Unix). It did the job perfectly!

mkvmerge GUI from mkvtoolnix has some disadvantages:
you can split after a given amount of time, but you can't split after several given amounts of time;
you can't preview the video in the mkvmerge, so you need to launch a player and remember the time when you need to split.

But it is fast. It support MPEG-4 AVC even with two audio tracks, so I recommend it!

Friday, August 29, 2008

SKY-HDTV on Ubuntu

Ubuntu 8.04 can detect cx23881 chipset automatically.
but It doesn't have tuner information.

so, let ubuntu know which tuner is used.

sudo vi /etc/modprobe.d/options

add following

# set sky HDTV
options cx88xx card=31 tuner=64


reboot and now you can use your tv card.

sudo modprobe cx88-dvb
sudo apt-get install dvb-utils

scan /usr/share/doc/dvb-utils/examples/scan/atsc/us-Cable-Standard-center-frequencies-QAM256 > channels.conf

if you want to use kaffeine as tv viewer

sudo apt-get install kaffeine

and convert channels.conf file in your home directory into kaffeine's channels.dvb file.

http://websvn.kde.org/branches/work/~pfister

download all the files in this url.
and compile it using make

you can get atsc-converter .

in your home directory atsc-converter channels.conf channels.dvb

you now can have channels.dvb
cp ./channels.dvb .kde/share/apps/kaffeine/channels.dvb

Wednesday, August 20, 2008

Get Information About Your BIOS in linux

http://www.cyberciti.biz/tips/querying-dumping-bios-from-linux-command-prompt.html


Get Information About Your BIOS / Server Hardware From a Shell Without Opening Chassis ( BIOS Decoder )
Posted by Vivek Gite [Last updated: July 24, 2008]

biosdecode is a command line utility to parses the BIOS memory and prints information about all structures (or entry points) it knows of. You can find out more information about your hardware such as:

=> IPMI Device

=> Type of memory and speed

=> Chassis Information

=> Temperature Probe

=> Cooling Device

=> Electrical Current Probe

=> Processor and Memory Information

=> Serial numbers

=> BIOS version

=> PCI / PCIe Slots and Speed

=> Much more


biosdecode parses the BIOS memory and prints the following information about all structures :

=> SMBIOS (System Management BIOS)

=> DMI (Desktop Management Interface, a legacy version of SMBIOS)

=> SYSID

=> PNP (Plug and Play)

=> ACPI (Advanced Configuration and Power Interface)

=> BIOS32 (BIOS32 Service Directory)

=> PIR (PCI IRQ Routing)

=> 32OS (BIOS32 Extension, Compaq-specific)

=> VPD (Vital Product Data, IBM-specific)

=> FJKEYINF (Application Panel, Fujitsu-specific)


In this tip you will learn about decoding BIOS data (dumping a computer's DMI ) and getting all information about computer hardware without rebooting the server.


More about the DMI tables


The DMI table doesn’t only describe what the system is currently made of, it also can report the possible evolutions such as the fastest supported CPU or the maximal amount of memory supported.


dmidecode - Read biosdecode data in a human-readable format


Data provided by biosdecode is not in a human-readable format. You need to use dmidecode command for dumping a computer’s DMI (SMBIOS) table contents on screen. This table contains a description of the system’s hardware components, as well as other useful pieces of information such as serial numbers and BIOS revision. Thanks to this table, you can retrieve this information without having to probe for the actual hardware.


Task: Display information about IPMI Device


# dmidecode --type 38

Output:


# dmidecode 2.7
SMBIOS 2.4 present.

Handle 0x0029, DMI type 38, 18 bytes.
IPMI Device Information
Interface Type: KCS (Keyboard Control Style)
Specification Version: 2.0
I2C Slave Address: 0x10
NV Storage Device: Not Present
Base Address: 0x0000000000000CA2 (I/O)
Register Spacing: Successive Byte Boundaries

Task: Display information about PCI / PCIe Slots


# dmidecode --type 9


# dmidecode 2.7
SMBIOS 2.4 present.

Handle 0x000E, DMI type 9, 13 bytes.
System Slot Information
Designation: PCIX#1-133MHz
Type: 64-bit PCI-X
Current Usage: Available
Length: Long
ID: 1
Characteristics:
3.3 V is provided

Handle 0x000F, DMI type 9, 13 bytes.
System Slot Information
Designation: PCIX#2-100MHz
Type: 64-bit PCI-X
Current Usage: Available
Length: Long
ID: 2
Characteristics:
3.3 V is provided

Handle 0x0010, DMI type 9, 13 bytes.
System Slot Information
Designation: PCIE#3-x8
Type: Other
Current Usage: Available
Length: Other
Characteristics:
3.3 V is provided

Handle 0x0011, DMI type 9, 13 bytes.
System Slot Information
Designation: PCIE#4-x8
Type: Other
Current Usage: Available
Length: Other
Characteristics:
3.3 V is provided

Handle 0x0012, DMI type 9, 13 bytes.
System Slot Information
Designation: PCIE#5-x8
Type: Other
Current Usage: Available
Length: Other
Characteristics:
3.3 V is provided

Task: Find out Information about BIOS


# dmidecode --type 0

Output:


# dmidecode 2.7
SMBIOS 2.4 present.
Handle 0x0000, DMI type 0, 24 bytes.
BIOS Information
Vendor: Phoenix Technologies LTD
Version: 6.00
Release Date: 01/26/2007
Address: 0xE56C0
Runtime Size: 108864 bytes
ROM Size: 1024 kB
Characteristics:
PCI is supported
PNP is supported
BIOS is upgradeable
BIOS shadowing is allowed
ESCD support is available
Boot from CD is supported
Selectable boot is supported
EDD is supported
3.5"/2.88 MB floppy services are supported (int 13h)
ACPI is supported
USB legacy is supported
LS-120 boot is supported
ATAPI Zip drive boot is supported
BIOS boot specification is supported
Targeted content distribution is supported

Understanding BIOS keywords


dmidecode --type {KEYWORD / Number }

You need to pass dmidecode following keywords:


  • bios

  • system

  • baseboard

  • chassis

  • processor

  • memory

  • cache

  • connector

  • slot


All DMI types you need to use with dmidecode --type {Number}:


# TypeShort Description
0BIOS
1System
2Base Board
3Chassis
4Processor
5Memory Controller
6Memory Module
7Cache
8Port Connector
9System Slots
10On Board Devices
11OEM Strings
12System Configuration Options
13BIOS Language
14Group Associations
15System Event Log
16Physical Memory Array
17Memory Device
1832-bit Memory Error
19Memory Array Mapped Address
20Memory Device Mapped Address
21Built-in Pointing Device
22Portable Battery
23System Reset
24Hardware Security
25System Power Controls
26Voltage Probe
27Cooling Device
28Temperature Probe
29Electrical Current Probe
30Out-of-band Remote Access
31Boot Integrity Services
32System Boot
3364-bit Memory Error
34Management Device
35Management Device Component
36Management Device Threshold Data
37Memory Channel
38IPMI Device
39Power Supply

Display Power supply information, enter:

# dmidecode --type 39

Display CPU information, enter:

# dmidecode --type processor

Read man page for more information:

$ man dmidecode


Other tools and commands to gather hardware information


Updated for accuracy.