windwos 8.1 was installed for BIOS+MBR type.
(one windows partion only, no EFI partion, windows RE partition, no MSR partition)
decide to change it into UEFI + GPT for boot speed.
here's the procedure that I followed.
1. download AOMEI pro (for converting MBR disk into GPT without data loss, pro version is requreired)
http://malwaretips.com/threads/aomei-partition-assistant-pro-edition-5-5-free-license-key-giveaway.20382/
2. change disk 0 into GPT disk (EFI partion is created autiomatically)
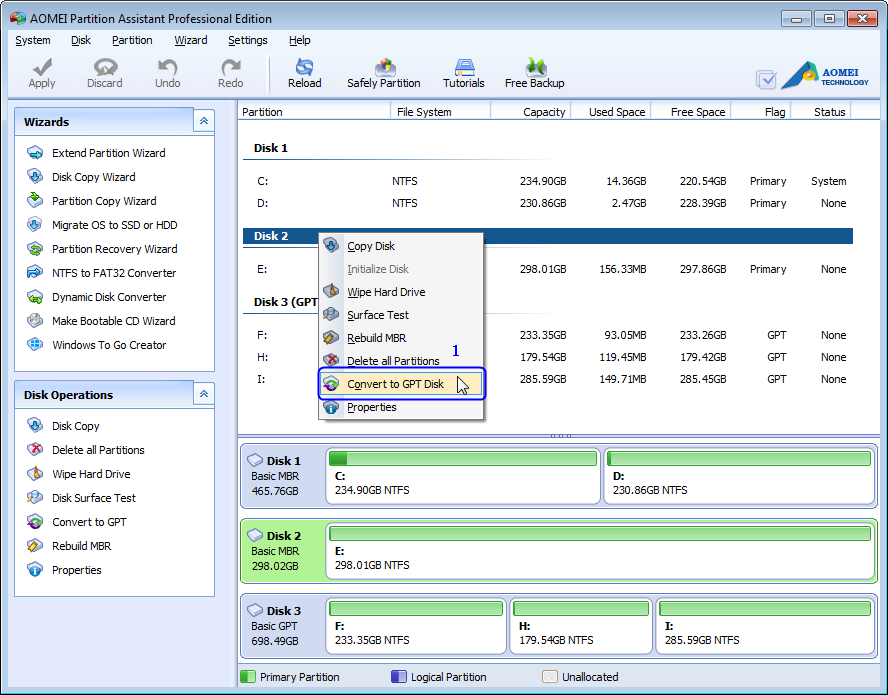
http://www.disk-partition.com/help/images1/convert-gpt-mbr-disk/convert-to-gpt-disk.png
3. resize windows partion for MSR (128 MB), windows RE(300 MB), and recovery image (over 1 GB)
https://technet.microsoft.com/en-us/library/hh825686.aspx

use the
DiskPart tool to run the script that automates
the configuration of the Windows RE Tools partition, the System, MSR,
Windows, and recovery image partitions.
( I did just copied needed command and paste it into diskpart mode in command prompt. for me, blue colored command is needed)
rem == CreatePartitions-UEFI.txt ==
rem == These commands are used with DiskPart to
rem    create five partitions
rem    for a UEFI/GPT-based PC.
rem    Adjust the partition sizes to fill the drive
rem    as necessary. ==
select disk 0
clean
convert gpt
rem == 1. Windows RE tools partition ===============
create partition primary size=300
format quick fs=ntfs label="Windows RE tools"
assign letter="T"
set id="de94bba4-06d1-4d40-a16a-bfd50179d6ac"
gpt attributes=0x8000000000000001
rem == 2. System partition =========================
create partition efi size=100
rem    ** NOTE: For Advanced Format 4Kn drives,
rem               change this value to size = 260 **
format quick fs=fat32 label="System"
assign letter="S"
rem == 3. Microsoft Reserved (MSR) partition =======
create partition msr size=128
rem == 4. Windows partition ========================
rem ==    a. Create the Windows partition ==========
create partition primary
rem ==    b. Create space for the recovery image ===
shrink minimum=15000
rem       ** NOTE: Update this size to match the size
rem                of the recovery image           **
rem ==    c. Prepare the Windows partition =========
format quick fs=ntfs label="Windows"
assign letter="W"
rem === 5. Recovery image partition ================
create partition primary
format quick fs=ntfs label="Recovery image"
assign letter="R"
set id="de94bba4-06d1-4d40-a16a-bfd50179d6ac"
gpt attributes=0x8000000000000001
list volume
exit
If you use the recommended
DiskPart script,
end users do not see the Windows RE Tools partition and the recovery
image partition in File Explorer. However, they can see and remove the
recovery image partition by using disk management tools.
If you want to prevent end users from removing partitions by using disk management tools, you can add the following
DiskPart command to the script when you create a partition.
gpt attributes=0x8000000000000001
4. deploy Windows® Recovery Environment (Windows RE)
https://technet.microsoft.com/en-us/library/hh825221.aspx
Create a new directory in the Windows RE Tools partition, and then copy your custom Windows RE tools image (Winre.wim)
mkdir T:\Recovery\WindowsRE
xcopy /h W:\Windows\System32\Recovery\Winre.wim T:\Recovery\WindowsRE
where T: is the drive letter of your Windows RE Tools partition
Register your custom Windows RE tools image:
C:\Windows\System32\Reagentc /setreimage /path T:\Recovery\WindowsRE /target W:\Windows
Optional: If you have added a custom tool to your Windows RE boot image, register it so that it will appear on the Boot Options menu:
Reagentc /setbootshelllink /configfile E:\Recovery\BootMenu\AddDiagnosticsToolToBootMenu.xml
Optional: Configure a hardware recovery button (or button combination) to run a secondary boot path that contains Windows RE
In Notepad, create a text file that includes commands to identify and
hide the recovery partitions. The following examples are based on your
firmware type:
UEFI:
Use the ID: PARTITION_MSFT_RECOVERY_GUID (de94bba4-06d1-4d40-a16a-bfd50179d6ac) to define the partitions as recovery partitions.
Use the GPT attributes: 0x8000000000000001 to hide the
drive letters and to mark them as required, by using a combination of
two attributes: GPT_BASIC_DATA_ATTRIBUTE_NO_DRIVE_LETTER and
GPT_ATTRIBUTE_PLATFORM_REQUIRED.
rem == HideRecoveryPartitions-UEFI.txt
select disk 0
select partition 1
remove
set id=de94bba4-06d1-4d40-a16a-bfd50179d6ac
gpt attributes=0x8000000000000001
rem == If Push-button reset features are included, add the following commands:
rem    select partition 5
rem    remove
rem    set id=de94bba4-06d1-4d40-a16a-bfd50179d6ac
rem    gpt attributes=0x8000000000000001
list volume
Run the diskpart script to identify and hide the recovery partitions:
Diskpart /s E:\Recovery\HideRecoveryPartitions-.txt
https://www.winhelp.us/custom-recovery-image-in-windows-8.html
enter the following command:
recimg -CreateImage \RefreshImage . Replace the
variable with the drive where you want to store the image. For example,
recimg -CreateImage C:\RefreshImage stores the image on system drive, in new folder named
RefreshImage.
Type
recimg /showcurrent and press
Enter key.
If
the last line is "Operation completed successfully", you are ready to
go. But if you see error 0x80070490 and message "There is no active
custom recovery image", the image is unavailable. Connect your external
drive and try again after about 10 seconds.
Sometimes you might want to deregister an image created by someone
else - it might be the image provided by your computer manufacturer
(that normally includes tons of useless programs) or maybe you bought a
used PC.
Again, open elevated Command Prompt - open Start screen (use
Windows Key), type "cmd" and click
Command Prompt while holding down
Ctrl and
Shift keys.
Type
recimg /deregister and press
Enter. Please remember that the custom image file or folder will not be deleted.
If you want to register an existing custom recovery image (you must do that after using Refresh your PC feature), type
recimg /setcurrent \RefreshImage\ and press
Enter. As usual, replace the
variable with the letter of the drive the image is on.
How to restore a Custom Recovery Image
Custom Recovery Images can be restored with the Refresh Your PC
process. Just plug in the drive where you keep the custom image, use
keyboard shortcut
Windows Key+I (touch-screen users can swipe in from the right side of screen and tap Settings) to open Settings Charm and click or tap
Change PC Settings in the bottom of the bar.
Windows 8 users should open
General tab on the left and click
Get started in the
Refresh your PC without affecting your files section.
In Windows 8.1, open
Update & recovery tab on the left, then open
Recovery tab and click
Get started in the
Refresh your PC without affecting your files section.
Then follow instructions in
Step 3 section of the
Repair your computer in Windows 8 and 8.1, page 2 tutorial.
If Windows is not able to boot, you can
use Windows installation DVD or Recovery Drive to launch Refresh Your PC.
